Agricultural Literacy Curriculum Matrix
Companion Resource
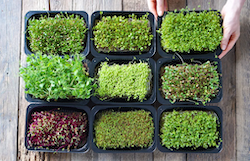
Growing Microgreens
Growing microgreens is a quick, easy, and tasty way to explore the seed germination and plant growth life cycle. There are MANY different kinds of microgreens—some taste mild and juicy, others pack a spicy punch! Try growing a variety of microgreens to observe and eat.
Materials
- Soil (Peat-based potting soil works well for microgreens)
- Microgreen seeds (Kale, broccoli, and pea shoots are excellent microgreens to grow in any classroom) Two sources for microgreen seeds:
- Containers (Many types of trays or growing containers work well for growing microgreens. Shallow "to-go" containers are a great, inexpensive option. True Leaf Market and Johnny's Selected Seeds also offer microgreen containers and other growing supplies.)
- Water (Spray bottles work well for watering microgreens)
Procedures
What are microgreens?
Microgreens are young and tender edible greens produced by sprouting the seeds of a variety of vegetable species and herbaceous plants. A few examples of microgreens include sunflowers, radishes, beets, totsoi, mustard, kale, onions, arugula, broccoli, and pea shoots.
Microgreens are harvested while the plant is young, so the vegetable does not mature. For example, radish microgreens are harvested before the plant can produce a radish. When it comes to eating microgreens, we are eating the baby greens of the plant!
Let's grow our own microgreens!
- Fill container with soil—about 2 inches deep, to the first fill line of the container.
- Add water to the soil and mix water into soil evenly (you could do this with your fingers). The soil should be uniformly moist.
- Make soil flat and then spread seeds throughout the container. Press the seeds into the soil for good seed to soil contact.
- Check seeds and soil daily. Place your finger in the soil and water when needed to keep the soil moist.
- Once most seeds have fully germinated (usually within 2-3 days), place under grow lights.
- Harvest microgreens when you see a set of first true leaves. For most microgreens, this is approximately 10 days after planting. Use scissors to cut the microgreen stems about 1/8 inch above the soil. It's a good idea to use isopropyl alcohol to clean and sanitize your scissors before harvesting. Remaining shoots and soil can be composted.
- Gently rinse microgreens with cold water before eating. Dry them with paper towels or a salad spinner.
- Eat and enjoy! Microgreens can be added to salads, sandwiches, and pizza. Experminet with eating microgreens on some of your favorite foods!
Explore the Small but Mighty: Microgreens in the Classroom presentation slides for additional microgreen growing information.1
Author
Organization
Sources
- Chris Wyant, experienced microgreen grower and Education Manager for Illinois Agriculture in the Classroom presented the Small but Mighty: Microgreens in the Classroom session at the 2023 National Agriculture in the Classroom Conference.